Monday, December 8, 2014

The 'Microsoft.Jet.OLEDB.4.0' provider is not registered on the local machine.

Scenerio:
I have an ASP program that I am running on a 2008 server with IIS 7 installed. I have address fields of state and zip code that are populated from an Access database. When the page loads, I get the error:

The 'Microsoft.Jet.OLEDB.4.0' provider is not registered on the local machine.


Log onto your server and open IIS with Administrative rights
Click on Application Pools.


Find the Application Pool that is being used for your ASP project.
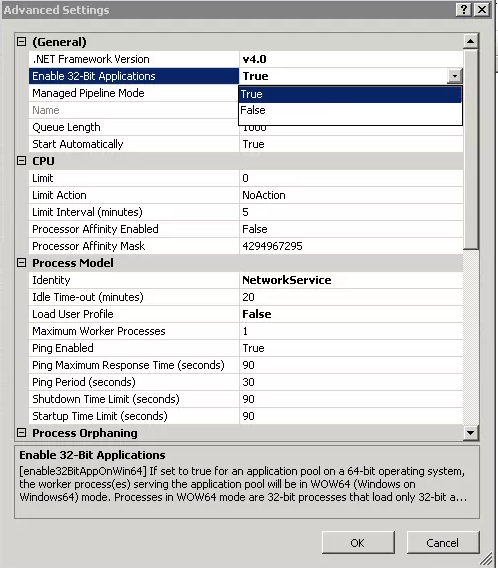
Right click on that Application Pool and choose Advanced Settings.


Change the setting "Enable 32-bit Applications" to "True"


Click Ok.

You may need to restart IIS for this to take effect.

Your webpage should now load correctly.

Tuesday, December 11, 2012

Recovering Hidden Files on Server 2003 after virus / malware

Recently, one of our clients got hit by a virus and several malware. Even after cleaning the virus and malware from the server (running Server 2003), the client machines (running Windows 7) were not able to see many of their files on their mapped drives. Even after restoring the files from backup, and verifying the files are on the server the client was not able to see them.

I took a deeper look at the folders and found that the HIDDEN and READONLY attributes were set. I found this by right clicking on the folder and going to properties.

For example, you can see from this screen shot that the folder "RECYCLER" is a lighter shade than the other folders.

When I right click the RECYCLER folder I see that the "Read-only" and the "Hidden" attributes are checked. You can also see that the "Hidden" attribute is greyed out. I can not uncheck the attribute.


Word of caution, some folders are SUPPOSED to be hidden and you should be sure that the folders you use the following "fix" on you WANT people to be able to see.

Next, I logged into the server (Server 2003) and opened a command prompt. I used the following command to clear the hidden attribute: >attrib -h -s foldername


As you can see, I just went down the line of folders. You can also create a batch script if there are a lot of folders and you don't want to type out each name.
Once this is done, the folder is no longer hidden, nor are the files inside of it and the clients can all see their mapped drive folders and files.


Saturday, August 25, 2012

Get rid of "protected mode" for documents on your network

With today's enhanced security, there are more and more doors to keep inturders out of our business. Sometimes, these doors can be annoying when all you want to do is open a document on your own server. As you know, storing documents on a server is a good practice, especially when multiple people will be using them or contributing to them.

Let me say I have a server called "MyServer" and it has an internal IP of 192.168.1.333 and I have permission to create, save, modify, and delete documents. For this example, I want to use a document that is my companies envelope.

I open the document in Word 2013 and this is what I see:


If I open the document in Word 2010 this is what I see:


As you can see, in both 2010 and 2013 my tool bar for editing is gone and I can not make any changes to the document. After Clicking the "Enable Editing" on either version then I can see my tool bar and all the editing tools.


This seems a simple enough thing, just click the "Enable Editing" button, what is the harm in that? The answer is absolutely nothing. Other than time. For those people that open and edit documents all day long, this one extra step can take hours of productivity a week away from them. So, what can we do? Let me show you a simple way to allow Office 2010 and Office 2013 to allow documents to be trusted.

First, you need to map a drive to your server, if you have not done so already. For those of you that are unfamiliar with mapping, I will not go into great detail here, but will take you through the basics. What a mapped drive does is exactly what its name implies, it creates a map to a drive on another computer, usually a server.

If I double click on My Computer, you can see that I have one drive (C:) and one DVD Drive (D:)
Notice the "Map Network Drive" option right under the address bar. Click it.

You will have a drop-down with all the available drive letters. Choose one that makes sense to you. 
You can either browse to the folder on the server or type in the address. This part is VERY important to remember for the later step. If you create the mapped drive with the name \\MyServer\TheFolder then you must also use the name when creating a trusted location below. If you use the IP \\192.168.1.333 then you must also use the IP when creating a trusted location below. Click finish to create the mapped drive.


Now when you open My Computer you will see the new drive.


Okay. Now that we have the mapped drive, we will move on to Office. We need to let Office know that the location we are opening the document from is trusted. From here on out the instructions and the screens are going to be the same for both 2010 and 2013 so I am going to be showing 2010 screen shots.

We need to get to the options menu. In Word click on the File and then down at the bottom, click Options.


Once you have the options screen open, Find the Trust Center option on the left. Click it.


In the left hand menu, find and click Trusted Locations.  You will see any location that is trusted by office. These values are stored in the registry. You should always modify, add, or delete locations through this menu unless you really know what you are doing in the registry.


Click on the "Add New Location". Here is where you want to put in the same location as the mapped drive. You can see in my screen shot that I browsed and selected the F:\ drive. This will NOT work. You need to either enter in the name (\\MyServer) or the IP (192.168.1.333) whichever you used in the step above.


Click Ok to get out of the screens.
Now when you open a document that is stored on your server in this folder you will no longer get the "Protected Mode" security. You should also see a decrease in the time it takes to open documents.


Thursday, June 28, 2012

Running a program that uses ODBC on a 64-bit PC with the database on a 32-bit PC/Server

With the push to upgrade to 64-bit the problems of using data across 32-bit and 64-bit has been...well, a headache and a pain in the butt!!  Luckily, most of these problems can be dealt with rather easily once you know how, but finding that how can be tricky.

Here is the scenerio:
We have a program running a SQL backend on a 32-bit Server 2003 machine. The front end is written in Access 2003. On Windows XP and Windows Vista 32-bit this works fine. The client recently started a slow upgrade as funds allowed and purchased a Windows 7 64-bit machine. The install program ran fine on the machine (logged on as the local administrator, not as a domain user). However, when I opened the program, it would give me a "ODBC Error - Cannot connect to XXXXX" Where XXXXX is the name of the database.

Here is the Problem:
The install program created the ODBC. If I went in and looked at the System DSN tab in ODBC (Administrative Tools -> ODBC -> System DSN Tab) I would see the correct entry. I could edit it and everything would be correct. I could test the connection and it would run successfully. Puzzling! I even deleted the entry and created it by hand, again getting a successful test but when I opened the program I would get the dreaded ODBC Error.

Here is the Solution:
A little known fact on 64-bit machines is there are TWO, yes TWO ODBC calls. Of course, the default is to call the 64-bit program. While the System DSN will test correctly, the 32-bit program does not know how to call that particular ODBC connection. What you will need to do is to browse to C:\Windows\SysWOW64\odbcad32.exe and run this exe program. What comes up is the all familiar ODBC screen. Switch to the System DSN tab and create the ODBC as you normally would. Close and open the program and Ta-Da, now the 32-bit program can find the correct ODBC and it connects to the database.

Wednesday, February 15, 2012

Fixing my Logitech M-UAG120 Mouse

I have a little Logitech M-UAG120 mouse that I carry around with my laptop. It fits my hand well and is small and compact making it great to slip in with my laptop. I have used it so much that the left click button had started not working. After the following steps, it is working like new!

What you will need:
* A small Phillips head screwdriver
* A toothpick
* Glue of some kind (I wanted to use Elmer's but all I had on hand was wood glue)
* A good working surface


1. First, make sure the mouse is unplugged.


2. Turn the mouse over so that the bottom is showing.


3. Peel off the adhesive sliders. You will want to take care of these so that you can reapply them afterwards. You should be able to slide your thumbnail under the slider to remove it.


4. Take out the 2 screws


5. Gently lift the back end of the cover up


6. After separating the back end, pull back and up to release the tabs on the front of the mouse.


7. You can see the two buttons here. I could see dust and debris from use on mine so I used a soft cloth to clean them. I also blew out any dust or hair out of the scroller and electrical board in general.


8. Now look at the top of the mouse. You can see the two buttons. I could actually see grooves in mine where the plastic had worn from pushing down on the switch located on the electrical board. This is why it was not registering the click!


9. Take a very small amount of glue on the end of the toothpick and place on the buttons. In my case it was easy to place on the buttons due to the grooves. Only a spot is needed.


10. Let the glue dry COMPLETELY before reassembling your mouse. If in doubt of how long this takes, let it sit for at least an hour.

11. To reassemble, slide the tabs at the front of the mouse into place, then pop the back of the mouse back in place. Replace the screws and reapply the adhesive pads to cover the screw holes. Plug in and wah-la!

Wednesday, November 16, 2011

New Look coming to Experts Exchange

As you all know, I try and contribute to Experts Exchange when I can. I am excited for their new look and layout coming in the next month or so! Keep an eye out for more of my posts and articles.


Small Experts Exchange VIP Badge

Wednesday, October 12, 2011

General Failure clicking on URL in Outlook when using Firefox

I use Outlook for my email and Firefox for my default browser. If you are like me, you get lots and lots of emails with links to websites in your email. An annoyance that has been plaguing me for several years now is that when I click on a link in Outlook, I get a message that says, "General Failure. The URL was: ...." and it tells me where I wanted to go. In the past, the URL always opened anyway so I just clicked OK on the message and went about my business.


However, with the upgrade to Outlook 2010 and more importantly Firefox 7.0.1 I get the message but the URL will not open, leaving me with a great big frowny face and no webpage to browse.

Here is an example of what I would get if I tried to open a link in an email from one of my favorite emails, Think Geek:

If this were the end of the story, I would not be posting this. If you too have a frowny face from frustration, simply follow the steps below to not only get the webpage to open, but to also get rid of the message all together.


  1. Close Firefox and Outlook (make sure they are completely closed, i.e. downloads window, popups, etc)
  2. Open Regedit by clicking on Start -> Run -> Regedit
    1. In Vista or Windows 7 you can click Start and type in Regedit in the search area. Make sure you right click and open "As Administrator"
  3. ***WARNING*** Changing keys in the registry can mess up your system. Please make sure you are comfortable using regedit and follow the steps EXACTLY!!
    1. Back up your registry by going to File -> Export
    2. You can back up the whole registry, or browse to the key we are going to change and just back it up. Either way, make sure you have a backup in case you need to revert back.
  4. Browse to HKEY_Classes_Root\FirefoxURL\Shell\Open\ddeexec
    1. You should see a key named Default with a value data of  "%1",,0,0,,,,
    2. Double click it to edit the value data
    3. Clear the value data so that it is blank
    4. Click OK
    5. Close Regedit
    6. Open Outlook and now when you click on an embedded URL not only will you not see the message, but FF will open automatically.