With the push to upgrade to 64-bit the problems of using data across 32-bit and 64-bit has been...well, a headache and a pain in the butt!! Luckily, most of these problems can be dealt with rather easily once you know how, but finding that how can be tricky.
Here is the scenerio:
We have a program running a SQL backend on a 32-bit Server 2003 machine. The front end is written in Access 2003. On Windows XP and Windows Vista 32-bit this works fine. The client recently started a slow upgrade as funds allowed and purchased a Windows 7 64-bit machine. The install program ran fine on the machine (logged on as the local administrator, not as a domain user). However, when I opened the program, it would give me a "ODBC Error - Cannot connect to XXXXX" Where XXXXX is the name of the database.
Here is the Problem:
The install program created the ODBC. If I went in and looked at the System DSN tab in ODBC (Administrative Tools -> ODBC -> System DSN Tab) I would see the correct entry. I could edit it and everything would be correct. I could test the connection and it would run successfully. Puzzling! I even deleted the entry and created it by hand, again getting a successful test but when I opened the program I would get the dreaded ODBC Error.
Here is the Solution:
A little known fact on 64-bit machines is there are TWO, yes TWO ODBC calls. Of course, the default is to call the 64-bit program. While the System DSN will test correctly, the 32-bit program does not know how to call that particular ODBC connection. What you will need to do is to browse to C:\Windows\SysWOW64\odbcad32.exe and run this exe program. What comes up is the all familiar ODBC screen. Switch to the System DSN tab and create the ODBC as you normally would. Close and open the program and Ta-Da, now the 32-bit program can find the correct ODBC and it connects to the database.
Thursday, June 28, 2012


Wednesday, February 15, 2012
Fixing my Logitech M-UAG120 Mouse
I have a little Logitech M-UAG120 mouse that I carry around with my laptop. It fits my hand well and is small and compact making it great to slip in with my laptop. I have used it so much that the left click button had started not working. After the following steps, it is working like new!
What you will need:
* A small Phillips head screwdriver
* A toothpick
* Glue of some kind (I wanted to use Elmer's but all I had on hand was wood glue)
* A good working surface
1. First, make sure the mouse is unplugged.

2. Turn the mouse over so that the bottom is showing.

3. Peel off the adhesive sliders. You will want to take care of these so that you can reapply them afterwards. You should be able to slide your thumbnail under the slider to remove it.

4. Take out the 2 screws

5. Gently lift the back end of the cover up

6. After separating the back end, pull back and up to release the tabs on the front of the mouse.

7. You can see the two buttons here. I could see dust and debris from use on mine so I used a soft cloth to clean them. I also blew out any dust or hair out of the scroller and electrical board in general.

8. Now look at the top of the mouse. You can see the two buttons. I could actually see grooves in mine where the plastic had worn from pushing down on the switch located on the electrical board. This is why it was not registering the click!

9. Take a very small amount of glue on the end of the toothpick and place on the buttons. In my case it was easy to place on the buttons due to the grooves. Only a spot is needed.

10. Let the glue dry COMPLETELY before reassembling your mouse. If in doubt of how long this takes, let it sit for at least an hour.
11. To reassemble, slide the tabs at the front of the mouse into place, then pop the back of the mouse back in place. Replace the screws and reapply the adhesive pads to cover the screw holes. Plug in and wah-la!
What you will need:
* A small Phillips head screwdriver
* A toothpick
* Glue of some kind (I wanted to use Elmer's but all I had on hand was wood glue)
* A good working surface
1. First, make sure the mouse is unplugged.

2. Turn the mouse over so that the bottom is showing.

3. Peel off the adhesive sliders. You will want to take care of these so that you can reapply them afterwards. You should be able to slide your thumbnail under the slider to remove it.

4. Take out the 2 screws

5. Gently lift the back end of the cover up

6. After separating the back end, pull back and up to release the tabs on the front of the mouse.

7. You can see the two buttons here. I could see dust and debris from use on mine so I used a soft cloth to clean them. I also blew out any dust or hair out of the scroller and electrical board in general.

8. Now look at the top of the mouse. You can see the two buttons. I could actually see grooves in mine where the plastic had worn from pushing down on the switch located on the electrical board. This is why it was not registering the click!

9. Take a very small amount of glue on the end of the toothpick and place on the buttons. In my case it was easy to place on the buttons due to the grooves. Only a spot is needed.

10. Let the glue dry COMPLETELY before reassembling your mouse. If in doubt of how long this takes, let it sit for at least an hour.
11. To reassemble, slide the tabs at the front of the mouse into place, then pop the back of the mouse back in place. Replace the screws and reapply the adhesive pads to cover the screw holes. Plug in and wah-la!
Wednesday, November 16, 2011
New Look coming to Experts Exchange
As you all know, I try and contribute to Experts Exchange when I can. I am excited for their new look and layout coming in the next month or so! Keep an eye out for more of my posts and articles.

Wednesday, October 12, 2011
General Failure clicking on URL in Outlook when using Firefox
I use Outlook for my email and Firefox for my default browser. If you are like me, you get lots and lots of emails with links to websites in your email. An annoyance that has been plaguing me for several years now is that when I click on a link in Outlook, I get a message that says, "General Failure. The URL was: ...." and it tells me where I wanted to go. In the past, the URL always opened anyway so I just clicked OK on the message and went about my business.
However, with the upgrade to Outlook 2010 and more importantly Firefox 7.0.1 I get the message but the URL will not open, leaving me with a great big frowny face and no webpage to browse.
Here is an example of what I would get if I tried to open a link in an email from one of my favorite emails, Think Geek:

If this were the end of the story, I would not be posting this. If you too have a frowny face from frustration, simply follow the steps below to not only get the webpage to open, but to also get rid of the message all together.
However, with the upgrade to Outlook 2010 and more importantly Firefox 7.0.1 I get the message but the URL will not open, leaving me with a great big frowny face and no webpage to browse.
Here is an example of what I would get if I tried to open a link in an email from one of my favorite emails, Think Geek:

If this were the end of the story, I would not be posting this. If you too have a frowny face from frustration, simply follow the steps below to not only get the webpage to open, but to also get rid of the message all together.
- Close Firefox and Outlook (make sure they are completely closed, i.e. downloads window, popups, etc)
- Open Regedit by clicking on Start -> Run -> Regedit
- In Vista or Windows 7 you can click Start and type in Regedit in the search area. Make sure you right click and open "As Administrator"
- ***WARNING*** Changing keys in the registry can mess up your system. Please make sure you are comfortable using regedit and follow the steps EXACTLY!!
- Back up your registry by going to File -> Export
- You can back up the whole registry, or browse to the key we are going to change and just back it up. Either way, make sure you have a backup in case you need to revert back.
- Browse to HKEY_Classes_Root\FirefoxURL\Shell\Open\ddeexec
- You should see a key named Default with a value data of "%1",,0,0,,,,
- Double click it to edit the value data
- Clear the value data so that it is blank
- Click OK
- Close Regedit
- Open Outlook and now when you click on an embedded URL not only will you not see the message, but FF will open automatically.


Saturday, April 9, 2011
Setting up SQL 2005 with and External IP
Setting up SQL to use an external IP can give you flexability to access a database without opening up a VPN tunnel or full fledged RDP session.
***WARNING***
This will open up ports in your firewall. You will want to take precautionary steps to be sure that you are not making your network and/or server vulnerable to attack. I will show you a few ways you can protect yourself when using this method.
There are several steps and/or checks to make sure are set.
Here's how to do it:
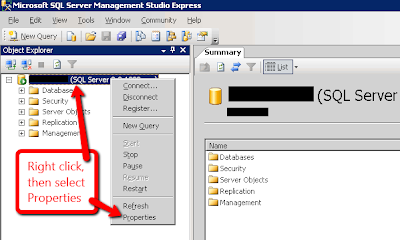
Open SQL Server Management Studio. Right click on the server and select Properties. This will show you the IP your SQL Server is using.
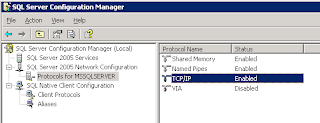
Open SQL Server Configuration Manager. Expand the SQL Server 2005 Network Configuration menu and highlight the "Protocols for MSSQLSERVER". Make sure that TCP/IP is enabled.
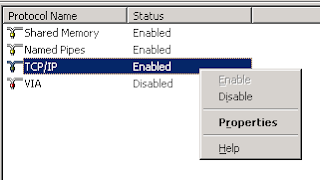
Right click on the "TCP/IP" and select Properties.
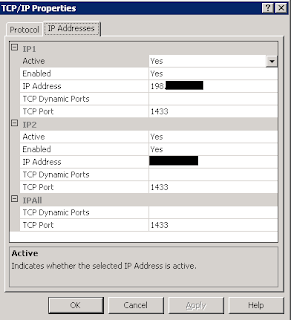 Click on the "IP Addresses" Tab.
You should see 3 different entries: IP1, IP2, and IPAll. Usually IP1 will be your external IP, IP2 will be your internal IP.
You can specify the external IP here. I have chosen the IP 198.113.113.113 (not a real IP) I will use the IP in later steps.
You can also specify the port that will be used. I will use the default port of 1433 for this example.
*TIP: Use a custom port to help with security.
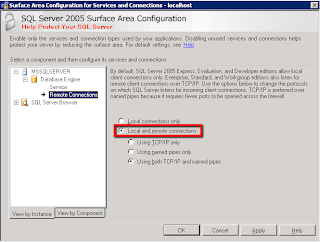
Next, open the Surface Area Configuration and click on MSSQLSERVER, expand the Database Engine, and click on Remote Connections. Make sure that the "Local and remote connections" option is selected. In the submenu, you can select either "Using TCP/IP only" or "Using both TCP/IP and named pipes"
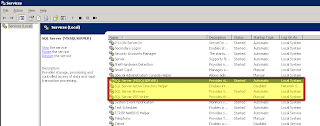
Open the Services by going to Start-> All Programs -> Administrative Tools -> Services
Make sure that SQL Server and SQL Browser services are started and are set to start automatically.
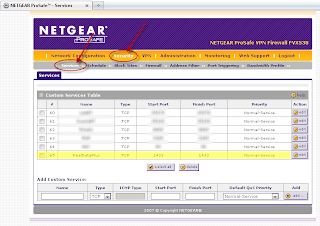
Now I need to configure my firewall to allow the connection. I am using a Netgear FVX358.
Click on "Security" and then on "Services"
I will add a service and name it "Real Data Plus". I will make it a TCP type and since I only want to open one port, I will make the "Starting Port" and "Ending Port" the same, the default 1433.
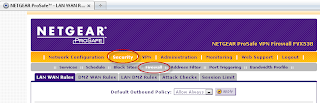

Now, I navigate to the "Firewall" menu, still under the "Security" settings.
Click on the "LAN WAN Rules" tab. Under the "Outbound policy" add a new entry. Be sure to name it the same as the Rule in the above step, in my case "Real Data Plus". Enter the internal address you want the traffic to be redirected to and the external ip the traffic will be coming from.
*TIP: For added security, specify the IP address or range that the traffic will be coming from. The firewall will block all others.

To test to make sure a connection can be made through the external IP open a command prompt and type the following command without the quotes: "sqlcmd -S 198.113.113.113,1433 -U sa" (Of course, use your own IP and port number) You will prompted for a password. Once you enter it, if you get the 1> prompt, you have successfully been connected. Type "EXIT". If you do not get this prompt, you are not able to be connected so something is not opened properly.
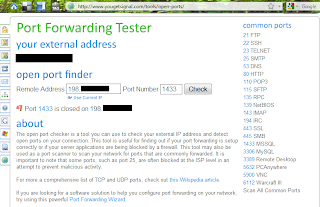
To test the port forwarding through the firewall, I used the website http://yougetsignal.com/tools/open-ports I entered the external address of 198.113.113.113 and the port 1433 and it came back to tell me that my port is opened or closed. This is useful, as then you know if it is a SQL problem or a firewall problem.
***WARNING***
This will open up ports in your firewall. You will want to take precautionary steps to be sure that you are not making your network and/or server vulnerable to attack. I will show you a few ways you can protect yourself when using this method.
There are several steps and/or checks to make sure are set.
Here's how to do it:

Open SQL Server Management Studio. Right click on the server and select Properties. This will show you the IP your SQL Server is using.

Open SQL Server Configuration Manager. Expand the SQL Server 2005 Network Configuration menu and highlight the "Protocols for MSSQLSERVER". Make sure that TCP/IP is enabled.
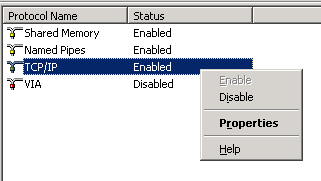
Right click on the "TCP/IP" and select Properties.
 Click on the "IP Addresses" Tab.
You should see 3 different entries: IP1, IP2, and IPAll. Usually IP1 will be your external IP, IP2 will be your internal IP.
You can specify the external IP here. I have chosen the IP 198.113.113.113 (not a real IP) I will use the IP in later steps.
You can also specify the port that will be used. I will use the default port of 1433 for this example.
*TIP: Use a custom port to help with security.

Next, open the Surface Area Configuration and click on MSSQLSERVER, expand the Database Engine, and click on Remote Connections. Make sure that the "Local and remote connections" option is selected. In the submenu, you can select either "Using TCP/IP only" or "Using both TCP/IP and named pipes"

Open the Services by going to Start-> All Programs -> Administrative Tools -> Services
Make sure that SQL Server and SQL Browser services are started and are set to start automatically.

Now I need to configure my firewall to allow the connection. I am using a Netgear FVX358.
Click on "Security" and then on "Services"
I will add a service and name it "Real Data Plus". I will make it a TCP type and since I only want to open one port, I will make the "Starting Port" and "Ending Port" the same, the default 1433.


Now, I navigate to the "Firewall" menu, still under the "Security" settings.
Click on the "LAN WAN Rules" tab. Under the "Outbound policy" add a new entry. Be sure to name it the same as the Rule in the above step, in my case "Real Data Plus". Enter the internal address you want the traffic to be redirected to and the external ip the traffic will be coming from.
*TIP: For added security, specify the IP address or range that the traffic will be coming from. The firewall will block all others.

To test to make sure a connection can be made through the external IP open a command prompt and type the following command without the quotes: "sqlcmd -S 198.113.113.113,1433 -U sa" (Of course, use your own IP and port number) You will prompted for a password. Once you enter it, if you get the 1> prompt, you have successfully been connected. Type "EXIT". If you do not get this prompt, you are not able to be connected so something is not opened properly.

To test the port forwarding through the firewall, I used the website http://yougetsignal.com/tools/open-ports I entered the external address of 198.113.113.113 and the port 1433 and it came back to tell me that my port is opened or closed. This is useful, as then you know if it is a SQL problem or a firewall problem.
Tuesday, January 4, 2011
How to use Terminal Server Licenses after a server crash
Recently I had the bad misfortune of having one of my servers that was acting as a terminal server crash. The server is running the Server 2003 OS. When I rebuilt the server all went well until I went to install the licenses. I have a 20 pack of Licenses bought as a retail pack.
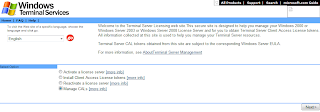
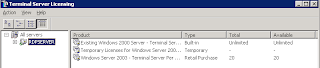
Reusing Terminal Server Licenses on a new server
When I entered the license key I received the message, Error: Already Activated.
I called Microsoft tech support and was transfered, lost the call, called back, was asked what the server ID was, was told I would have to call another number to have someone walk me through finding the ServerID and then call back. Called the new number but they were not open (apparently not a 24-hour service), tried calling back and again lost the call. Tried one more time and again lost the call.
By now, I am frustrated to say the least! I decided to spend my time Googling the problem instead of calling 800 numbers all night. I found a solution that is SO much easier than trying to understand and communicate with outsourced tech support.
I give credit to this website (http://kbalertz.com/953918/Terminal-Services-license-server-another-Windows-Server-Windows-Server.aspx) that guided me through most of the necessary steps, which I will outline below.
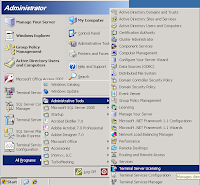
First, go to the Server and click on Start -> All Programs -> Administrative Tools -> Terminal Server Licensing

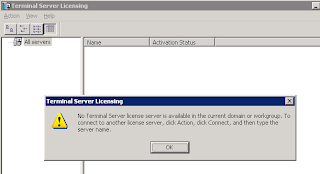
If your server does not show up but you have added the role, you may see a message like this:

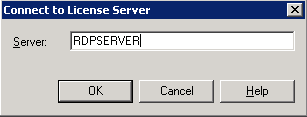
Click on Action -> Connect


Then enter in the name of the Terminal Service Server. If you don't know the name of your server, you can find it by clicking on Start -> All Programs -> Administrative Tools -> Terminal Server Manager

Right Click on the server name and select Properties.


On the first tab (Installation Method) change your Installation Method to Telephone. Select the country and then click OK.


Now right click on the server name again and choose Install Licenses.


The Terminal Server CAL Installation Wizard will come up. Click Next.


You will see the License Server ID here. Make a note of it. You will need this number when you call Microsoft or go to the activation website, as I did. Leave this window open, as you will need to enter in the new license key here.


Now that you have the License Server ID, open a web browser and go to https://activate.microsoft.com/
On the first page, select Manage CALS and click Next.

On the second page, enter in the License Server ID you obtained above. If you know the old License Server ID, you can enter it here as well. Since my server crashed, I did not know the old ID so I left those fields blank.
I chose the reason for recovery as redeployment and retail purchase for the License Program.
Click Next.


On the next page you will be asked to enter in the License Key as well as information about the License Keys and who they were sold to. Enter in the information and click Next. You will be given a new License Key. Be sure to print the page and/or jot down the new key.
Now, enter the new key into the Cal Installation Wizard screen. The wizard will try and activate the license and when successful you will be congratulated.
Now if you go to Start -> All Programs -> Administrative Tools -> Terminal Service Licensing you will see your licenses.

Reusing Terminal Server Licenses on a new server
Sunday, January 17, 2010
Searching SQL Database for Keyword
If you want to search an SQL data base (specifically SQL 2005) for a Keyword, use the following code changing KEYWORD to the term you are searching for:
SELECT ROUTINE_NAME, ROUTINE_DEFINITION
FROM INFORMATION_SCHEMA.ROUTINES
WHERE ROUTINE_DEFINITION LIKE '%KEYWORD%'
AND ROUTINE_TYPE='PROCEDURE'
ORDER BY ROUTINE_NAME
SELECT ROUTINE_NAME, ROUTINE_DEFINITION
FROM INFORMATION_SCHEMA.ROUTINES
WHERE ROUTINE_DEFINITION LIKE '%KEYWORD%'
AND ROUTINE_TYPE='FUNCTION'
ORDER BY ROUTINE_NAME
SELECT ROUTINE_NAME, ROUTINE_DEFINITION
FROM INFORMATION_SCHEMA.ROUTINES
WHERE ROUTINE_DEFINITION LIKE '%KEYWORD%'
AND ROUTINE_TYPE='PROCEDURE'
ORDER BY ROUTINE_NAME
SELECT ROUTINE_NAME, ROUTINE_DEFINITION
FROM INFORMATION_SCHEMA.ROUTINES
WHERE ROUTINE_DEFINITION LIKE '%KEYWORD%'
AND ROUTINE_TYPE='FUNCTION'
ORDER BY ROUTINE_NAME
SELECT NAME
FROM sysobjects
WHERE id IN ( SELECT id FROM syscolumns WHERE NAME like '%KEYWORD%' )
Subscribe to:
Posts (Atom)
